How to Curl Hair with a Straightening Iron Like a Pro
POSTED ON August 12, 2025
If you’re looking for a quick and easy way to curl your hair, a straightening iron can be your best friend. You don’t need a separate curling iron to achieve beautiful curls or beachy waves. Curling your hair with a straightener can give you bouncy curls or soft, beachy waves with just one tool. If you’re in a hurry or looking for a low-maintenance styling option, curling hair with a straightener is a great alternative.
In this guide, we’ll show you how to Curl Hair with a Straightening Iron, the best techniques for different curl types, and tips for long-lasting curls. Let’s get started!
Why Curl Hair with a Straightening Iron?
You might wonder, “Why curl hair using a straightener?” Well, here’s why a straightener can be your go-to tool for curls:
- Versatility: A straightener can create a variety of curl styles, from tight ringlets to loose, beachy waves, allowing you to achieve multiple looks with just one tool.
- Convenience: If you’re in a hurry or don’t have a curling iron handy, a straightener can save you time and space. It’s a multipurpose tool!
- Smoother curls: Compared to a curling iron, a straightener glides smoothly through the hair, reducing frizz and offering more polished curls.
- Time-saving: You can curl and straighten with the same tool, making it easier to switch between styles without needing extra equipment.
Step-by-Step Guide: How to Curl Hair with a Straightening Iron
If you think straightening irons are only meant for sleek, pin-straight hair, think again. With the proper technique, a flat iron can help you create everything from soft, beachy waves to bouncy, glamorous curls.
This method is quick, works on almost any hair length, and can give you a salon-quality look right in the comfort of your home.
Step 1: Prep Your Hair for Curling
Preparing your hair properly ensures that your curls not only look beautiful but also last longer and stay healthy.
- Start with clean, dry hair
Wash your hair with a gentle shampoo and follow with a lightweight conditioner. Clean hair holds curls better than hair weighed down with oils, sweat, or heavy products. - Apply heat protectant
Before you even think about picking up your straightener, spray a good-quality heat protectant evenly throughout your hair. This will form a barrier between your strands and the high heat of the iron, helping prevent breakage, dryness, and split ends. - Remove tangles
Gently brush your hair using a paddle brush or wide-tooth comb. Tangle-free hair allows the straightener to glide smoothly, creating even, flawless curls without snagging.
Step 2: Select the Right Flat Iron
Choosing the right tool can make a significant difference in the final appearance of your curls.
- Look for rounded plates
A straightener with rounded or bevelled edges is ideal for curling, as it prevents harsh lines and creases in the hair. Sharp-edged plates are better suited for straightening only. - Match the plate size to your hair length
If you have short hair, choose a narrow straightener with plates around one inch wide. This gives you more precision and allows you to get closer to the roots. For long hair, a slightly wider plate can curl larger sections at once, making the process faster and more efficient. - Check the heat settings
A straightener with adjustable temperature controls is best. It allows you to tailor the heat to your hair type, avoiding unnecessary damage.
Step 3: Section Your Hair
Working in sections helps ensure that every strand gets equal attention, resulting in curls that look polished and uniform.
Start by dividing your hair into three to four horizontal layers. Clip the upper layers securely on top of your head, leaving the bottom layer loose to curl first.
For tighter, more defined curls, take small sections of hair at a time, about one inch wide. For softer, looser waves, work with larger sections of hair.
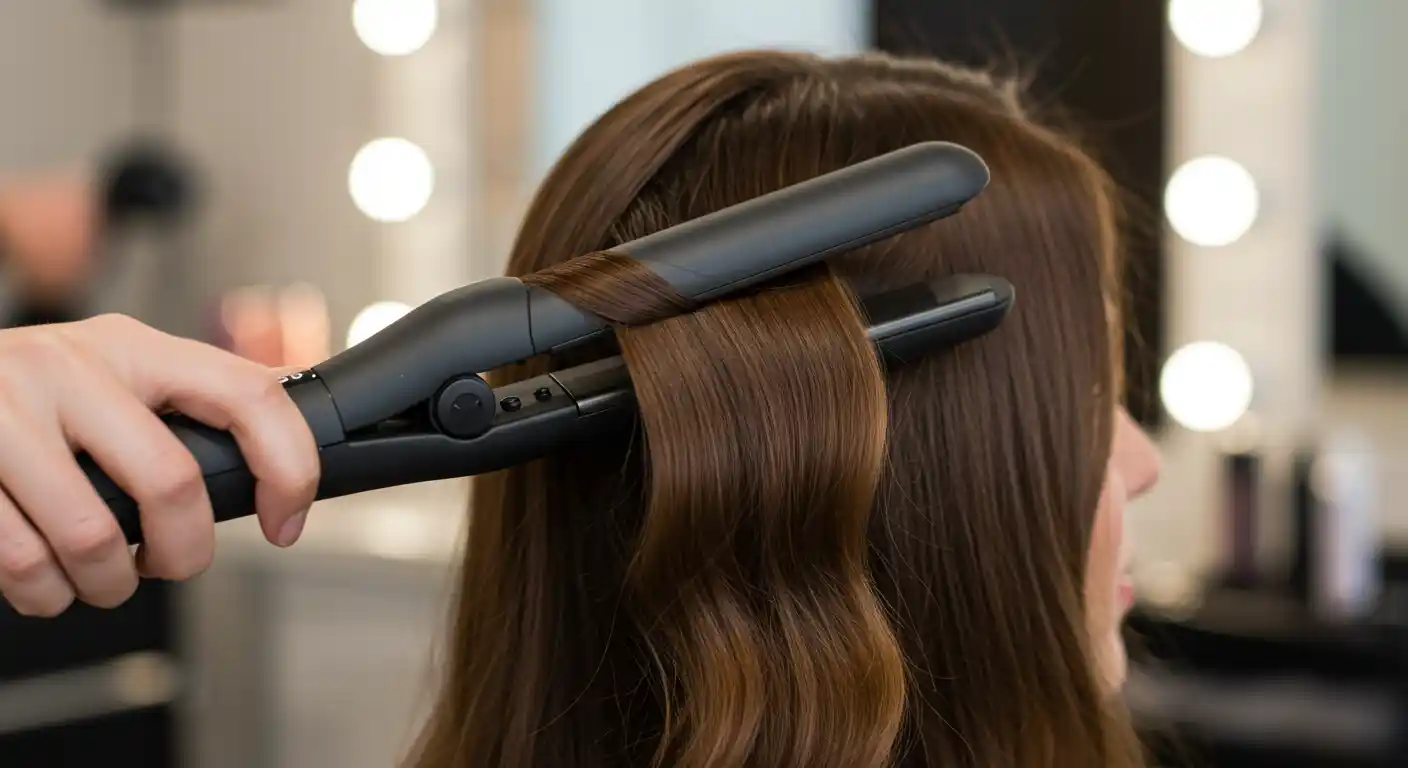
Step 4: Master the Curling Technique
This is where the magic happens.
- Position the iron
Take your first section and clamp the flat iron near the roots, keeping it about an inch away from your scalp to avoid burns. - Add the twist
Rotate the straightener either half a turn for looser curls or a complete turn for tighter curls. The more you twist, the more defined the curl will be. - Glide smoothly
While maintaining the twist, slowly glide the iron down the length of your hair. Moving too quickly can result in weak, under-formed curls, while stopping for too long can leave visible kinks or bends. - Release and cool
Once the curl is complete, let it fall naturally and avoid touching it until it cools. Cooling locks in the shape, making the curl last longer.
Step 5: Style and Finish Your Curls
Once you have curled all your sections, it’s time to style them for your desired look.
Allow your curls to cool completely before touching or combing them. This helps set the shape and prevents them from loosening prematurely. For a natural, effortless style, gently separate the curls with your fingers. If you prefer a more polished, vintage-inspired look, use a wide-tooth comb to smooth them into soft, wavy hair.
Finish with a light mist of flexible-hold hairspray to keep the curls in place without making them stiff or sticky.
Additional Tips for Perfect Flat Iron Curls
- For relaxed, beachy waves, alternate the curling direction with each section. Curl one section away from your face and the next towards your face.
- For tighter, bouncier curls, twist the straightener more and work with smaller sections.
- Adjust your flat iron’s heat setting according to your hair type. Fine or damaged hair should stay between 160°C and 180°C (320°F to 356°F), while thick or coarse hair can handle 190°C to 200°C (374°F to 392°F).
You can transform your straight locks into stunning curls with just a straightening iron — or get a flawless, damage-free finish with our Curl and Straightening Care.
Conclusion:
Curling your hair with a straightening iron is a quick, versatile, and effective technique that saves time and eliminates the need for multiple styling tools. Once you master the twist-and-glide method, you can create a variety of looks, from casual, tousled waves to red-carpet-ready curls, all with the same tool. With the proper preparation, technique, and finishing touches, your curls can look stunning and last all day.
For all your hair care and styling needs, check out De-HairProfile at our Orchard Gateway hair salon, where we provide top-quality styling tools and products to help you achieve your dream hair effortlessly.
FAQs
1. How to curl hair with a flat iron?
To curl hair with a flat iron, you can either twist the iron while gliding it down or wrap the hair around the iron and slide it through.
2: How can I curl straight hair using a straightening iron?
Clap a small section of hair near the roots, twist the straightener 180 degrees, and slowly glide it down. Let curls cool before styling and finish with hairspray.
3: How do I curl short hair without using heat?
Twist damp hair into sections and secure with clips or use foam rollers. Leave overnight, then gently loosen and set with styling spray.
4: How do you curl long hair with a straightener?
Curl in small sections by twisting and pulling the straightener down the hair. Clip curls to cool in place, then spray for hold.